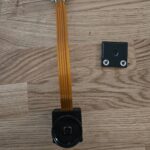
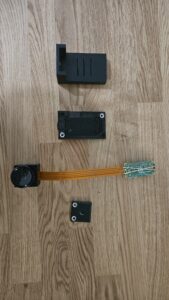
The camera is basically a Raspberry pi Zero W 2 and a Raspberry pi Camera module 3.
The case is custom 3d printed and built for this specific application. The idea behind it was to have an assembly I could screw on a standard tripod head, because a tripod would be the best way to keep the camera still and steady. All shots are 12-13 second shots, so it’s extremely important for the camera to be steady while shooting long exposures.
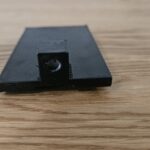
The front of the camera enclosure fits a 37mm filter which can be used with any 37mm filter, I have tried using simple UV filters, Red and IR filters depending on the application.
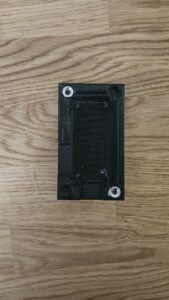
Another issue was weather sealing. Since the camera is 24/7/365 exposed to the weather elements, it has to be both stable and weatherproof. PLA can sometimes work like a sponge/net and will let water seep through. It also tends to keep moisture in, especially if going through winter/autumn when there’s a lot of rainfall. This case has been printed @ 50% infill and after that it has been plastidipped to ensure weather sealing/water resistance.
Plastidip doesn’t allow water to pass through the plastic enclosure, keeping all the internals dry. However, since this raspberry relies on passive cooling only, remains to be seen how it’ll hold up against the summer sun.
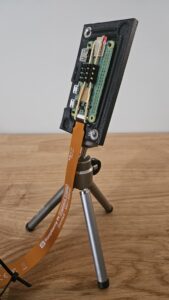
There are plans to convert the whole assembly to a standalone device using a battery pack and a solar panel. That means the camera needs to be able to withstand any weather while being cool and dry. During the winter, the CPU temp doesn’t rise over 30-35 Celsius during shooting, which means during the night.
In daytime and idling, temp is around 25 Celsius. Throttling for the Pi doesn’t start until 80 Celsius, so that remains to be checked and dealt with during the summer. Ideally we wouldn’t need a fan, since it won’t be shooting during the day and in the night, temperatures drop significantly.
The case is “modular”, which means if something breaks/doesn’t work it can always be reprinted without having to print the whole case. Neodymium magnets have been used to keep the case and the camera compartment tight. Modularity also gives us a better updateability of the whole system, in case we need a different sensor or a different raspberry in the future. The zero has been chosen due to it’s small form factor and low power consumption.
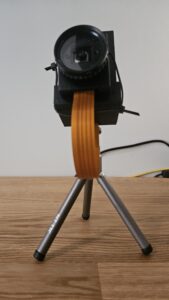

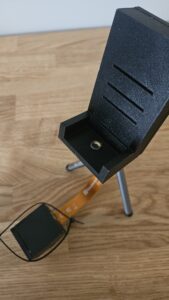
The camera assembly is screwed on top of a standard tripod 1/4 inch screw. This allows us to mount the case on any tripod available since all tripods carry the same thread.
The weakest links in the whole assembly are the little plastic thing that holds the flat ribbon in place on the Pi and the SD card.
Even the best SD cards, they are simply not made to be operating in all weather conditions. Any residual humidity or dust will definitely deteriorate the lifespan of a normal SD card. Let alone one what’s always on and reads/writes every day.
The ribbon holder is also insanely easy to break. I know because I’ve broken a few and even though I have tried 3d printing replacements, none seems to fit. It’s important for the ribbon to be steady in place, as it’s very easy for the whole Pi to become unresponsive if the ribbon cable is not correctly placed.
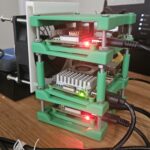
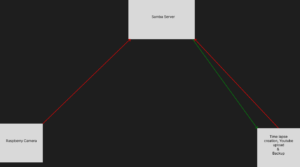
The last part of the hardware are the two Raspberry Pis involved, a Pi4B 4GB and a Pi5 4GB. The RPi 4 runs a Samba server that helps the system keep backups of both the images and the video generated. It also serves a home file server for everything that needs to be available sitewide. The RPi 5 is responsible for downloading the images from the server, convert them into a video and upload it to YouTube. After download, it stores the final video back on the SMB server and does some housekeeping. You definitely don’t need two systems to keep the folders tidy and render a video. Only reason I have done it this way is because the systems were already in place and I had to split the load since the SMB server is old and the RPi5 is more powerful.
Unfortunately the RPi 5 doesn’t offer h.265 hardware encoding which would be the best compromise for this project. Encoding 4k video in h.265 is simply impossible using the Pi. Maybe in future iterations a H/W encoding/decoding module will be added. All in all the conversion of 2500 4k images into a 100 second 4K h.264 video with the Pi 5 takes about 45 minutes to an hour.